Did you know that over 30 million orchids are sold each year in the United States alone?
With so many orchid enthusiasts seeking to maintain the captivating beauty of their blooming orchids, a critical aspect of orchid care is often overlooked: repotting.
Many are surprised to learn that the longevity and health of these exquisite plants are heavily reliant on the condition of their potting mix and the timing of repotting.
I’ve discovered that a high-quality orchid potting mix should be refreshed every one to three years to ensure healthy orchid roots and prevent the detrimental buildup of salts and decomposition.
Whether you’re a seasoned grower or new to the enchanting world of orchids, understanding when and how to repot is fundamental.
Observing new root growth, typically in the spring, serves as nature’s gentle nudge, indicating it’s time to repot.
Meanwhile, a telltale sign is when your orchid starts to overstep its home, reaching beyond the confines of its pot.
However, it’s crucial to wait until the orchid has finished its blooming cycle before embarking on this delicate task to avoid damaging the plant.
Key Takeaways
- Repotting orchids is crucial for maintaining a thriving environment free of decomposed potting mix and harmful salts.
- Healthy orchid roots benefit from a potting mix refresh every one to three years, ideally after the blooming cycle.
- Springtime often signals new growth and is an optimal period for repotting orchids.
- Immediate repotting may be necessary if the orchid is too large for its pot or the potting media has significantly degraded.
- Post-bloom repotting allows the plant to focus its energy on establishing a robust root system in fresh potting mix.
Understanding the Repotting Process for Orchid Health
As an avid orchid enthusiast, I’ve learned that healthy orchid maintenance is more than just regular watering and proper lighting; it also involves timely repotting to rejuvenate the plant’s growing conditions.
Let’s delve into why this ritual is crucial and how to recognize when it’s necessary.
Benefits of Regular Repotting
Repotting is not just a matter of routine care; it provides extensive repotting benefits to your orchids.
Introducing your plants to a fresh optimal potting mix goes beyond the surface appeal, it’s about enhancing the health and vigor of your orchids.
A new potting environment can prevent root rot, provide room for root expansion, and reduce the build-up of harmful salts that could otherwise cause distress and hinder growth.
Selecting the Proper Timeframe: Every One to Three Years
Marking your calendar every one to three years for repotting may seem arbitrary, but it’s a timeline that serves a purpose.
Orchids aren’t fond of change yet can significantly benefit from potting mix replenishment within this interval.
The best practice is to observe your own orchids’ growth patterns and health which, when paired with a reliable schedule, ensures you never miss a beat in providing ideal care for these exquisite plants.
- Afford your plants the chance to thrive in an environment free of pathogens.
- Enable roots to absorb nutrients efficiently from fresh media.
- Promote stronger blooming cycles, thanks to rejuvenated growing conditions.
Incorporating these practices into your orchid care routine will help ensure that each plant continues to flourish and radiate beauty in your home or greenhouse.
Indicators That It’s Time to Repot Your Orchid
As an orchid enthusiast, I’ve learned that recognizing the right time to repot is crucial for the health and vitality of these exquisite plants.
Identifying the various repotting indicators can guide you to ensure your orchids continue to flourish. Let’s delve into the signals that suggest it’s time for a fresh start.
Watching for Decomposition and Compactness of Potting Media
One of the first signs that you should be on the lookout for is the state of the potting media.
Over time, organic components break down, leading to potting media decay. When the mixture starts to crumble into a fine, dense consistency akin to coffee grounds, it’s a clear indicator that repotting should be on your agenda.
This compaction can restrict airflow and water drainage, potentially damaging the delicate root system of your orchid.
Identifying New Growth as a Signal for Repotting
The sight of new growth, such as vibrant green roots or fresh leaves, is nature’s way of signaling optimal repotting conditions.
This typically occurs during spring, a time when orchid growth signals are most active.
New growth suggests that your orchid is entering a phase of vigorous development, where it would greatly benefit from fresh potting media to support its expansion.
The Lifecycle of Blooms: After Blossoms Have Fallen
An orchid’s blossoming cycle also provides a natural cue for repotting. Once the plant has shed its flowers, it enters a period of less susceptibility to stress.
This post-bloom phase is ideal for repotting, as it allows the orchid to settle into its new environment and prepare for the next flowering period without the added energy demand of sustaining blooms.
Physical Signs: Orchid Outgrowing Its Pot
Physical evidence can be the most telling when it comes to repotting necessity.
When you notice roots or pseudobulbs spilling over the edges of their container, it’s a clear sign that your orchid has outpaced its current home.
To prevent any harm and ensure your plant has adequate space to grow, repotting becomes an immediate priority.

By keeping an eye on these vital signs, you’ll be well-equipped to maintain the health and joy that orchids bring into our homes.
When to Repot an Orchid
Understanding the orchid repotting schedule is essential to maintaining the vitality and orchid health preservation.
My experience with these exotic plants has led me to recognize that the ideal time for repotting is closely tied to active orchid growth.
This ensures that the orchid is robust enough to handle the stress of being moved to a new environment.

Each orchid species may have slightly different needs, but in general, repotting should take place every one to two years to sustain plant health and encourage flowering.
The schedule syncs with the orchid’s natural cycle, with the best time for repotting being shortly after the blooming period when the plant is entering an active growth phase.
This can be noticeable by the appearance of new leaves or roots.
Immediate repotting should be considered if you observe any of the following scenarios:
- Detection of disease or pest infestation
- Severe deterioration of the potting medium
- Signs of over-fertilization
- Symptoms of root rot indicating compromised plant health
In such cases, hastening the repotting process is critical to prevent further damage. I always advise thoroughly inspecting the root system and employing a fresh, suitable potting mixture.
This proactive approach is crucial for the orchid’s recovery and continued blooming.
Let’s always remember, that the foliage of an orchid can be deceptive, often appearing undisturbed even when the roots require attention.
By adhering to a structured repotting schedule, we can ensure our orchids remain a source of natural beauty and splendor in our homes.
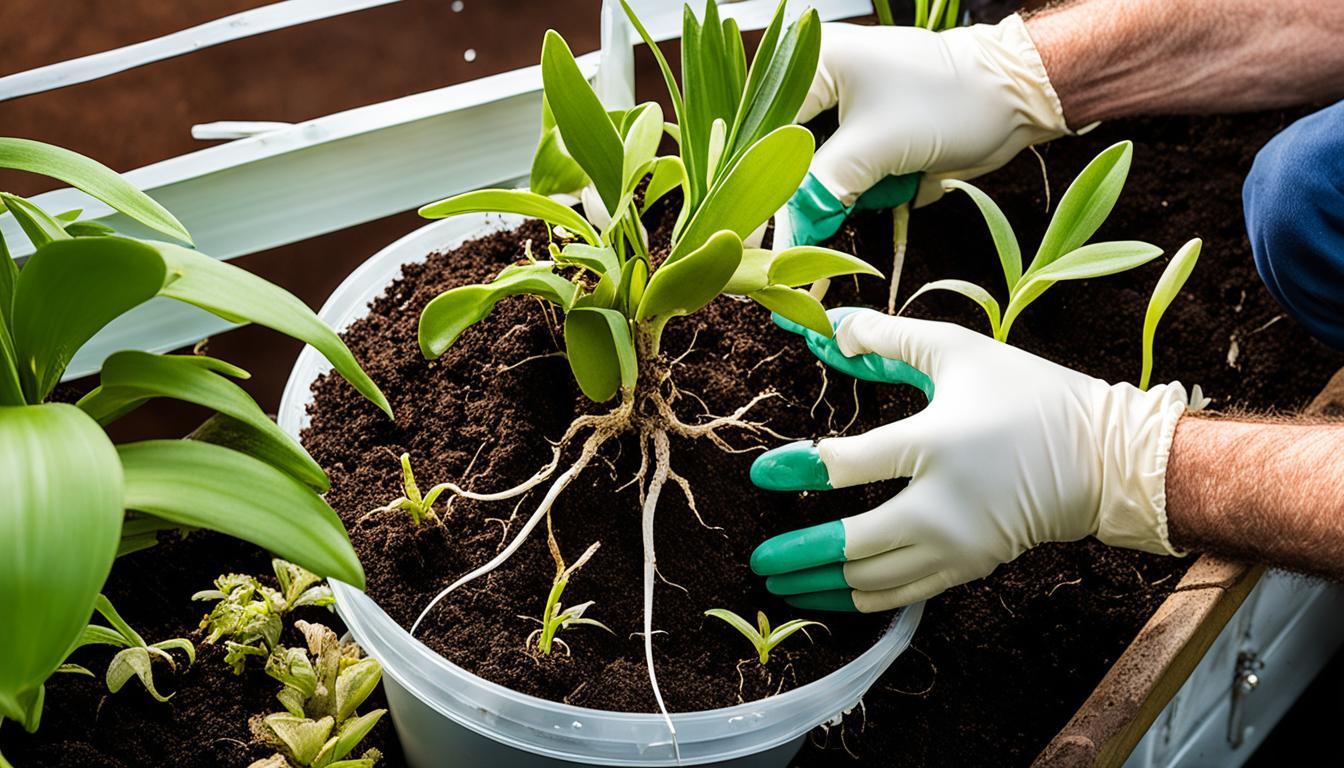
Preparing to Repot: Gathering Necessary Tools and Materials
As my readers look forward to repotting their cherished orchids, it is imperative to begin with assembling the right set of repotting tools.
Achieving a sterile repotting process starts with sanitized equipment to curb any disease that may threaten the delicate root systems of these stunning plants.
Therefore, I make sure to use only sterilized scissors or pruners and always put on clean, snug-fitting gloves before I interact with the plant.
Orchid enthusiasts know well that the instruments of repotting are as important as the process itself.

Creating a Sterile Work Environment
Ensuring a sterile work area is more than just good practice; it is a necessity for protecting our orchids against unwanted pathogens while repotting.
I make it a routine to thoroughly disinfect surfaces and tools with 70% isopropyl alcohol or a 10% bleach solution.
A clean working area supports a healthier transition for orchids into their new homes.
Choosing the Right Potting Mix and Containers
Selecting the right potting mix and the container is instrumental in the repotting journey.
I often rely on high-quality commercial orchid mixes but don’t shy away from customizing them, as different species may have varying needs.
The orchid container selection is equally crucial; a slightly larger pot than the current one usually works best, allowing for growth without compromising the plant’s need for moisture and air circulation around the roots.
Customizing Potting Media for Specific Orchid Needs
Different orchids will thrive in different media. Here is where my knowledge of my plants’ preferences comes into full play.
While some orchids prefer sphagnum moss for its water retention, others might fare better with a bark-based mix that promotes drainage.
Understanding and catering to these demands will result in more robust and blooming orchids post-repotting.
| Orchid Type | Recommended Potting Media | Container Consideration |
|---|---|---|
| Phalaenopsis | Fine-grade bark or sphagnum moss | Clear plastic pots for monitoring root health |
| Cattleya | Medium-grade bark with perlite | Sturdy clay pots for stability and moisture balance |
| Dendrobium | Coarse-grade bark mix | Baskets that allow ample air flow |
| Oncidium | Bark and charcoal mix | Shallow pots to accommodate sprawling roots |
Selecting the Appropriate Pot and Potting Medium
For my fellow orchid enthusiasts, I’ve uncovered that the selection of a proper orchid pot and the correct orchid potting medium selection is pivotal in maintaining orchid root health.
It’s not just about the aesthetics; it’s about providing the perfect habitat for your orchid to flourish.
With the wide variety of pots and mediums available, it’s imperative to make informed decisions that cater to the specific needs of your orchid’s root system.

Let’s delve into the types of pots perfect for your prized orchids. The goal is always to ensure they have ample room to breathe and grow.
Consider a pot with excellent drainage, as orchids detest waterlogged conditions, and one that is only slightly larger than the orchid’s root ball to avoid oversaturation of the potting medium.
A clean pot is a non-negotiable feature to prevent pesky pathogens from taking hold.
| Pot Type | Drainage | Material | Suitability |
|---|---|---|---|
| Traditional Plastic Pots | Bottom holes | Plastic | All orchid types; Lightweight and cost-effective |
| Ceramic Pots | Bottom and side holes/slits | Ceramic | Epiphytic orchids; Provides a heavy, stable base |
| Net Pots | Extensive aeration | Mesh Plastic | Vanda orchids; Excellent for air root development |
| Clear Pots | Multiple holes/slits | Transparent Plastic | Allows monitoring root health and moisture levels |
Next, let’s talk about the potting medium. The perfect potting medium nurtures and supports your orchid’s roots.
Factors such as decomposition rate, pH stability, and the medium’s texture influence your orchid’s happiness and health.
Aerial roots demand a coarse medium for better airflow, while finer roots may require a slightly finer medium to retain moisture without becoming waterlogged.
- Bark Mixes: Ideal for providing good aeration and drainage
- Sphagnum Moss: Holds moisture well, suited for orchids requiring a more moist environment
- Coconut Husk Chips: Durable and rot-resistant, allowing long-term use
- Charcoal: Adds to the mix by improving pH balance and filtration
- Perlite or Pumice: Enhances the mix’s ventilation and moisture retention attributes
A harmonious relationship between pot and medium brings out the best in your orchids, leading them on the path to vigorous growth and stunning blooms.
Remember, a proper home for your orchid’s roots is the bedrock of its health and beauty.
Conclusion
In this comprehensive guide, I’ve explored the nuanced art of successful orchid repotting, emphasizing that the optimal repotting period is influenced by an orchid’s health, growth patterns, and the condition of its potting media.
As we’ve discovered, staying observant of your orchid’s needs and repotting every one to three years is paramount to maintaining its vitality and ensuring an impressive bloom display.
Review of Optimal Timing for Repotting Orchids
My findings highlight that the best time to undertake repotting is when your orchid has finished its blooming cycle or when you notice a compromised potting mix.
By aligning repotting efforts with these periods, you provide your orchid with the greatest chance for resilience and uninterrupted growth.
The attention paid to detail during these moments can make a significant difference in your orchid’s overall health and flowering future.
Final Tips and Best Practices for Orchid Repotting Success
As we wrap up, I want to leave you with some cardinal best practices in the orchid repotting arena: utilize the appropriate tools, ensure a clean work environment, and choose the best potting medium tailored to your orchids’ needs.
Remember to consider each orchid’s unique characteristics, such as its growth cycle and specific root system requirements. And don’t forget the crucial aftercare; it’s essential to support your orchid as it acclimates to its new surroundings.
By following these practices, you can enjoy the fulfilling journey of nurturing these exquisite plants to their full, blooming glory.
FAQ
How often should I repot my orchid to ensure optimal health?
It is generally recommended to repot orchids every one to three years to maintain healthy orchid roots and support the blooming process. The potting mix should also be refreshed to prevent salt build-up and decomposition.
What are the benefits of regular repotting for an orchid?
Regular repotting promotes healthy orchid maintenance by preventing root rot, providing fresh nutrients, enhancing growth, ensuring adequate air circulation to the roots, and aiding in disease prevention.
What signs indicate that it’s time to repot my orchid?
Signs that your orchid needs repotting include potting media breakdown, resembling coffee grounds, new growth such as roots or leaves (typically in the spring), and the physical outgrowing of its pot.
When is the best time during the orchid’s lifecycle to repot?
The best time to repot an orchid is after the blossoms have fallen and when the orchid is showing signs of entering a new active growth phase, although immediate repotting may be necessary if the orchid outgrows its pot or if you observe signs of disease or decay.
What kind of tools and materials do I need for repotting an orchid?
You will need sterilized scissors or pruning shears, snug-fit gloves, a suitable new pot with proper drainage, and fresh potting mix tailored to orchid care. A clean workspace is also important to prevent contamination.
How do I create a sterile work environment for repotting my orchid?
Disinfect your tools with rubbing alcohol or a 10% bleach solution, clean the work surface thoroughly, and wash your hands before handling your orchid to minimize the risk of introducing pathogens.
How do I choose the right potting mix for my orchid?
Select an orchid potting mix that provides good drainage and aeration; it can be a blend of bark, sphagnum moss, perlite, or charcoal. Consider your orchid species’ specific needs, as some may require a more moisture-retentive or free-draining medium.
What should I consider when selecting a pot for my orchid?
Choose a pot that is slightly larger than the root system, which allows for growth without being too spacious. Ensure it has adequate drainage holes to prevent water-logging. Consider materials like plastic or clay based on your orchid’s moisture needs and your watering habits.
Can I customize the potting media for my specific orchid type?
Yes, customizing the potting media to match the particular needs of your orchid’s root system can greatly benefit its growth and health. Additives can be used to modify water retention or drainage to suit thin or thick orchid roots, among other characteristics.
How does the right potting medium affect orchid root health?
The right potting medium supports orchid root health by providing proper aeration, moisture retention, and nutrient availability. It also minimizes the risk of root diseases and facilitates robust growth.
Leave a Reply