Embarking on the journey of orchid propagation can be as simple as diving into a comprehensive orchid root division guide. As a gardening enthusiast, I’ve experienced firsthand the beauty and satisfaction that comes from learning how to divide orchid roots.
Through this step-by-step orchid root division tutorial, I aim to equip you with the knowledge to multiply your beloved plants and revel in the exquisite beauty that each new orchid bloom brings to your home.
Whether you’re a seasoned grower or a curious beginner, understanding the process of orchid root division unlocks a world of possibility. Gently coaxing your orchids into giving rise to new life not only expands your collection but also ensures the health and vigor of these intriguing plants.
Together, we’ll navigate through every precise cut and careful consideration inherent to successful orchid propagation, so your green thumb can turn an array of orchids into an orchid enthusiast’s treasure trove.
Key Takeaways
- Gain confidence in orchid propagation through a detailed guide on root division.
- Discover the rewards of expanding your orchid collection using precise division techniques.
- Learn the proper timing and methods for sympodial and monopodial orchid root division.
- Find out how to prepare and provide the ideal environment for newly divided orchids.
- Embrace the joy of nurturing and witnessing the vibrant growth of your propagated orchids.
Understanding the Necessity of Orchid Root Division
When I observe my orchid collection, I am often reminded of the incredible benefits of orchid root division. It is an essential procedure to learn for any orchid enthusiast.
As these splendid plants mature, their increasing size can lead to overcrowded pots, making it harder for them to access necessary nutrients and moisture. The dividing orchid plants process becomes pivotal to not only managing space and health but also to propagating additional plants for your collection or to share with fellow orchid lovers.
The orchid division process contributes significantly to the plant’s life cycle, offering the promise of rejuvenation for older plants that may appear to be declining.
By dividing the orchids, I provide them with more room to flourish, an act that stimulates healthier growth and could lead to a spectacular blooming season as soon as the following year.
It’s an exhilarating experience to see an orchid that I’ve divided bursting with color and life, affirming that division is more than just maintenance – it’s an investment in the plant’s future vibrancy.
Key Takeaways
- Space Management: Dividing orchids helps manage the size of the plant, preventing overcrowding and encouraging healthy foliage and blooms.
- Propagation: Through division, orchid enthusiasts can create new plants, enhancing their collection or gifting to friends.
- Plant Health: Removing older parts of the orchid and repotting young divisions can lead to increased vigor and disease resistance.
- Spectacular Blooms: Divided orchids can potentially show more vibrant blooms, sometimes sooner than their undivided counterparts.
- Longevity: Orchid division is key to the long-term flourishing of these exotic plants in a cultivated environment.
My years tending to my orchids have taught me the importance of timing in the division process. It typically aligns with a plant’s natural growth cycle, performed when new pseudobulbs form roots, a sign of preparedness for division.
Observing these signs becomes a ritual, signaling the ideal moment to bring out my potting mix and start the propagation journey once more.
| Orchid Condition | Significance | Action |
|---|---|---|
| New Pseudobulb Growth | Indicates readiness for division | Begin division process |
| Overcrowded Pot | Limits growth potential | Divide to allocate space |
| Mature Plant Decline | Signals need for rejuvenation | Divide to promote vitality |
In conclusion, without the practice of dividing my orchid plants, I would miss out on the opportunity to both nurture and expand my treasured collection. Understanding the necessity of the orchid root division has shaped the way I care for these remarkable plants, ensuring their beauty endures season after season.
Preparing for Successful Orchid Division
Before you embark on the journey of dividing your orchid plants, a thorough preparation process is essential. This involves discerning the type of orchid you are working with, timing the division for optimal success, establishing a sterile environment, and assembling the necessary orchid propagation tools.
Identifying Your Orchid Type
Knowing whether your beloved plant is one of the sympodial orchids or monopodial orchids is crucial in determining the appropriate method for orchid plant division.
If your orchid sends out shoots from a horizontal rhizome and develops pseudobulbs, it falls under the sympodial category – think of orchids like Cattleya or Oncidium.
Conversely, monopodial orchids, such as the well-adored Phalaenopsis or the striking Vanda, grow upwards from a central stem and are best propagated through the careful handling of aerial roots or the rehoming of keikis.
Timing Your Division Perfectly
When to divide orchid roots is not a decision to be taken lightly. You’ll want to wait until after the bloom cycle concludes, ensuring the orchid has sufficient energy reserves for a successful propagation.
However, an exception lies with the keikis that can appear during flowering – these can be potted up while the blooms are still showing off their splendor.
Creating a Sterile Environment for Propagation
Maintaining a clean and disease-free environment is vital for orchid propagation. Sterilizing your work area and equipment cannot be overstated in its importance, playing a critical role in preventing the spread of pathogens and ensuring the production of healthy new orchid plants.
Gathering Essential Tools
To ensure you are fully prepared for the orchid division, here’s a list of orchid propagation tools you need to have on hand:
- A sharp knife or razor blade for precise cuts
- A spray bottle filled with sterilizing alcohol or bleach solution
- Various-sized pots to accommodate new divisions
- High-quality orchid potting medium
- Optional fungicide to treat cut areas and prevent infection
Equipping yourself with these tools will set you up for a successful orchid division experience, allowing you to multiply the beauty of your orchids with confidence.

Orchid Root Division: The Process Explained
Embarking on the orchid division process can seem intimidating at first, but with my trusty orchid root division guide, you’ll be dividing orchids like a pro.
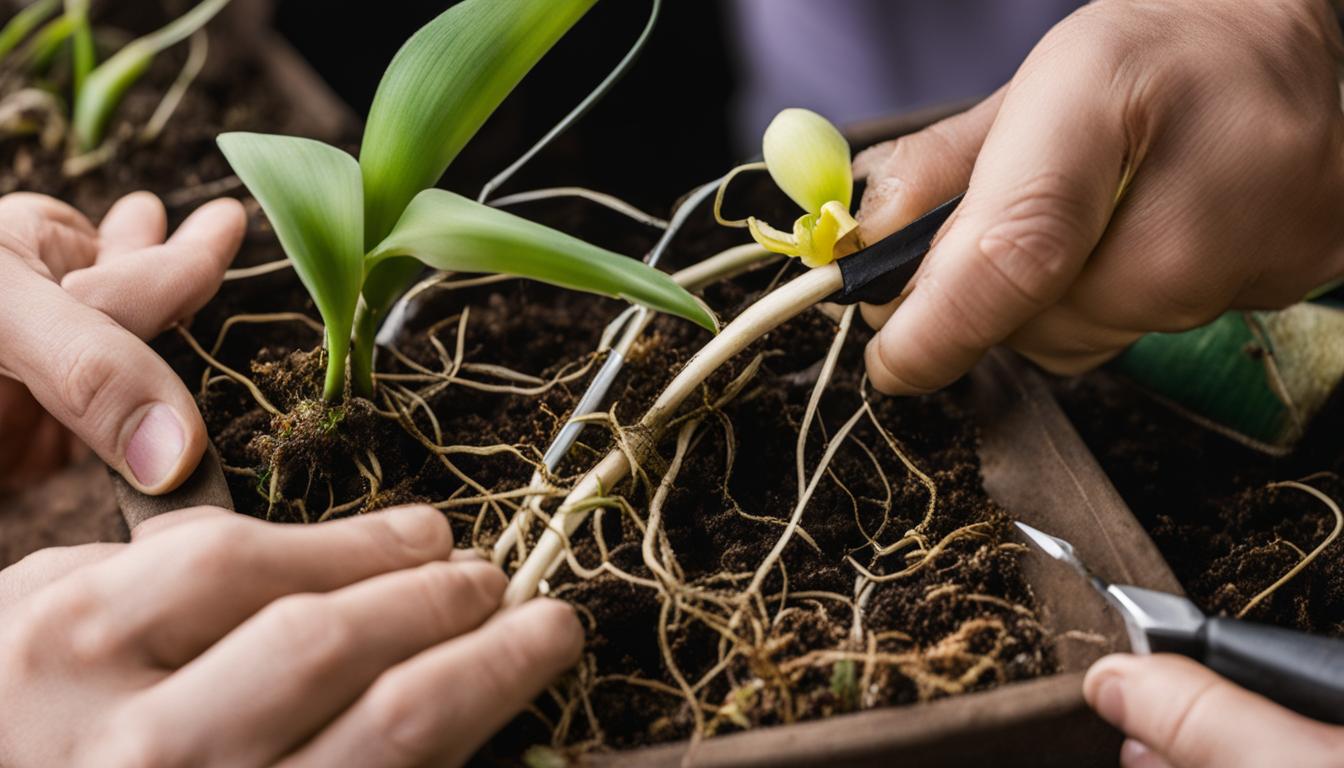
First things first, the division of your orchid roots needs to be executed with precision and care. Whether dealing with sympodial or monopodial species, understanding how to divide orchid roots is key to the propagation of healthy and flowering orchids.
For sympodial orchids, I recommend identifying the primary rhizome to determine where to make your cuts. You want to look for those groups of rhizomes that are actively growing, or ‘leads,’ and aim to include about three to four in each division.
On the other hand, monopodial orchids usually provide “offspring” called keikis, which, along with any healthy aerial roots, form the base of your new plant.

Keen gardeners, remember this: always, and I mean always, use sharp, sterile tools for the division. This prevents the spread of disease and gives your orchids the clean cut-they deserve.
If you’re feeling extra cautious, you can treat the cut surfaces with a fungicide, or for those who prefer a natural approach, hydrogen peroxide or cinnamon do the trick quite nicely.
Once you’ve divided the orchids, it’s time to rehome them. Choose a pot that’s the right size (not too large) and fill it with an appropriate orchid potting mix.
This ensures that your newly divided orchid has the perfect environment to start anew. It won’t be long until you’ll need to transition to a regular maintenance schedule, which promotes new growth and eventually, stunning blooms.
It’s important to remember that the orchid root division guide doesn’t end here. Aftercare is vital for your orchid’s recovery and growth. Keep following along our journey of orchid cultivation to ensure your newly propagated plants don’t just survive, they thrive.
Post-Division Care for Thriving Orchids
After the meticulous process of orchid plant division care, the steps we take next are pivotal to ensure vibrant orchid growth. I want to share with you the essential post-division care routine that caters to orchid division watering and overall maintenance for a flourishing orchid propagation environment.
Appropriate Watering Practices
In my experience, the key to successful post-division watering is balance. Initially, I recommend lightly misting the orchid’s new potting mix and stems each day to maintain the right level of humidity.
Avoid heavy watering until you observe the emergence of a new leaf – this practice is essential in preventing root rot and encouraging healthy development.

Fostering the Right Environment
Setting up an ideal orchid propagation environment is not overly complicated. Orchids love stability, so creating a space with warm temperatures, sufficient humidity, and indirect sunlight will significantly aid in their recovery post-division.
I often place them near a southeast-facing window to simulate their native habitat, promoting their revival and growth.
When to Start Fertilizing Your Orchid
Patiently waiting for new roots to form before introducing fertilizers is a vital part of fertilizing divided orchids. Once you notice these signs of growth, begin fertilization with a gentle solution.
This progressive reintroduction to nutrients supports the plant in re-establishing itself, ultimately paving the way for a vibrant bloom.
Throughout this journey, it becomes clear that a solid orchid care routine post-division can make all the difference between merely surviving and truly thriving.
With these steps, you can indeed give your orchids the love and attention they need to flourish.
If you’re interested in gaining a deeper understanding of orchid care, I invite you to explore my comprehensive articles covering the various aspects mentioned above. You can find them here:
Orchid Lighting Requirements: Sunlight and Artificial Light,
Orchid Temperature and Humidity Control Techniques,
Understanding Orchid Watering Needs: Frequency and Methods,
Choosing the Right Soil and Potting Mixes for Orchids,
Fertilizing Orchids: Types and Application Schedules.
Conclusion
Mastering the art of orchid root division is a rewarding journey that enhances the well-being and variety of your precious orchid assortment. I discovered that with a clear understanding of my orchids’ specific needs and growth patterns, I could effectively propagate them, ensuring a lush and vibrant garden.
The step-by-step orchid root division guide we’ve walked through is more than a set of instructions; it’s a gateway to becoming an active participant in the life cycle of these exquisite plants.
Creating a sterile environment for propagation was a game-changer for me, minimizing the risk of infection and maximizing the potential for healthy new growth.
As I meticulously followed the guidelines, patience was indeed a virtue, rewarding me with the emergence of fresh roots and leaves, a testament to the care and attention invested during the division process.
In providing my newly divided orchids with tender, post-division care, I’ve seen firsthand how a focused care regimen dramatically influences their recovery and growth. Indeed, the flourishing blooms I’ve cultivated stand as proof that even individuals new to gardening can excel at this technique.
I hope my insights empower you to embrace the process of orchid root division, and I look forward to hearing about the abundant blossoms that will surely grace your living spaces.
FAQ
What is the primary benefit of dividing orchid plants?
The primary benefits of dividing orchid plants include managing the size of the plant, promoting healthier growth, propagating new plants, and rejuvenating mature plants which can result in more vibrant blooms.
How do I identify if my orchid is sympodial or monopodial?
Sympodial orchids grow with a rhizome and have pseudobulbs, while monopodial orchids have a central stem from which the leaves and flowers grow. If your orchid develops pseudobulbs, it is sympodial; if it grows vertically from a single stem, it is monopodial.
When is the best time to divide orchid roots?
The ideal time to divide orchid roots is soon after the orchid has finished its bloom cycle but before you refresh the potting medium or repot the plant.
What steps should I take to create a sterile environment for orchid division?
To create a sterile environment, sterilize all tools and work surfaces before starting the division process. This can be done with rubbing alcohol or a solution of 10 parts water to 1 part bleach. Also, wash your hands thoroughly to prevent the spread of disease to the orchid roots.
What tools do I need for successful orchid root division?
You’ll need a small knife or razor blade for cutting, a spray bottle, new pots, suitable orchid potting medium, and optionally, fungicide or natural alternatives for treating cut surfaces.
Can you explain the process of orchid root division step by step?
The process involves removing your orchid from its pot, gently cleaning the roots, identifying the primary rhizome for sympodial orchids (or finding keikis or suitable aerial roots for monopodial), and then using sterilized tools to separate the divisions. After making the divisions, pot each new section in an appropriate potting mix and care for them as individual plants.
How should I water my orchids after division?
After dividing, mist the potting medium and stems lightly each day but avoid watering directly until you see a new leaf or active root growth. This helps prevent rot and encourages healthy root development.
What environment do newly divided orchids need to thrive?
New orchid divisions should be kept in warm temperatures, with high humidity, and indirect light, such as a southeast-facing window or similar conditions to encourage proper development.
When is it safe to start fertilizing my divided orchid plants?
You should wait to fertilize until new roots have appeared since fertilization before this can harm the fragile new growth. Begin with a diluted fertilizer solution and gradually return to a regular feeding schedule as the plant establishes itself.
Leave a Reply