As a long-time orchid enthusiast, I’ve found that there’s something particularly gratifying about propagating my own orchids from leaf cuttings.
It’s a process that requires some finesse and patience, but with the right approach, even a beginner can witness the miraculous transition of a single leaf into a flourishing orchid plant.
The secret lies in the careful selection of healthy leaves, the use of disinfected pruning shears, and creating an environment with sphagnum moss that invites robust root development.
Growing orchids from leaf cuttings is not just a hobby; it’s an art that melds the precision of botany with the nurturing touch of a gardener.
To those unfamiliar with orchid leaf cutting propagation, let me assure you that while it might seem daunting at first, it’s a deeply rewarding venture once you understand the basic steps and necessary conditions.
Key Takeaways
- Orchid leaf-cutting propagation is an accessible method for gardeners to expand their collection.
- Success with orchid cuttings relies heavily on clean, sterilized tools to prevent disease.
- The use of sphagnum moss is critical for providing the ideal moisture and aeration needed by new roots.
- Understanding when to propagate is just as crucial as the propagation technique itself.
- Patience is a virtue in the process of growing orchids from leaf cuttings, as it can take time for a new plant to establish.
Understanding Orchid Propagation Methods
Let’s dive into the fascinating world of orchid propagation, a realm rich with various methods tailored to different types of these exotic plants. While propagating orchids from leaf cuttings offers an entry point for many enthusiasts, other techniques play a significant role in the life cycle of orchids.
Understanding these methods can greatly increase your success with cultivating orchids at home. Whether you’re dealing with monopodial or sympodial varieties, each approach requires a certain finesse and knowledge.
Let’s explore the intricacies of propagating through division and the joy of nurturing orchid keikis.
Monopodial vs. Sympodial Orchids
Orchids are often categorized based on their growth patterns, with the two main types being monopodial and sympodial.
Monopodial orchids, such as the beloved Phalaenopsis or the striking Vanda, grow vertically from a single stem, making orchid stem cuttings a viable method for propagation once they’re mature.
On the other hand, sympodial orchids like the diverse Dendrobiums spread horizontally and are typically not suitable for stem cuttings, with notable exceptions such as Dendrobium nobile.
Propagation Through Division
Another common method for multiplying your orchid collection is propagating through division. This is particularly suited for sympodial orchids, which grow in segments.
After reaching a suitable size with multiple pseudobulbs, the orchid can be divided, ensuring that each new section has at least one set of leaves and roots.
‘Back bulbs’, dormant segments that retain the potential for growth, represent a wealth of opportunity for starting new plants and harnessing the regenerative powers of these resilient species.
Keikis: The Gift of New Growth
In the magical orchid lifecycle, sometimes a plant will offer a gift, orchid keikis. Keikis are adorable offshoots that emerge as miniature replicas of the parent plant.
Especially common in monopodial orchids, keikis grow along the stem or at the base of the plant and can serve as a straightforward means of propagation. These baby orchids should be allowed to mature until they have developed a robust root system.
With care and precision, they can then be separated from the mother plant to begin a new chapter of life on their own. The parent-child bond in the orchid world is a delicate dance of growth, patience, and nurture.
The Essentials of Orchid Care During Propagation
For those of us who revel in the delicate beauty of orchids, understanding the nuances of orchid leaf propagation is paramount. It’s not just about how to take leaf cuttings from orchids; it’s also about creating the right environment for cuttings to thrive.
Paying heed to the specific needs of your orchid can make the difference between a thriving new plant and a propagation attempt that falls short.
Let’s delve into how cultivating the right conditions can contribute to the success of propagating orchids through leaf cuttings.
Creating the Right Environment for Cuttings
I cannot stress enough the importance of the environment when it comes to nurturing your orchid cuttings.
The right balance of humidity and warmth, coupled with a clean growing area, is essential for the cuttings to develop effectively.
Let’s examine the key factors that make up the ideal propagation space:
- A consistent humidity level, which encourages healthy root development without promoting mold or rot.
- Adequate warmth to simulate the tropical conditions many orchid varieties naturally prefer.
- Bright, indirect light to provide the energy your cuttings need to grow without the risk of scorching them.
- Proper ventilation to reduce the risk of bacterial and fungal growth, which can be detrimental to your new cuttings.
These elements collectively create a nurturing haven for your new orchid progenies, setting the stage for a successful propagation process.
When to Propagate: Timing for Success
Timing, while often overlooked, is a critical piece of the propagation puzzle. To increase the chances of success, the following timeline should be meticulously observed:
- Propagate soon after the orchid’s bloom cycle has concluded, capitalizing on the plant’s natural growth period.
- Ensure propagation precedes any repotting or refreshing of the growing medium to minimize stress on the plant.
- With keikis, wait until they have developed proper roots before gently separating them from the mother plant.
Abiding by these timing guidelines as well as providing a conducive environment ushers in a new generation of beautiful orchids from your existing plants.

Remember: The successful propagation of orchids through leaf cuttings not only requires a green thumb but also an informed approach to care and timing.
By considering each vital aspect thoughtfully, you can foster new growth and enjoy the fascinating world of orchid propagation in your own home.
Orchid Leaf Cuttings
Mastering the orchid leaf cutting technique is an art form that can lead to the thrilling experience of nurturing an exquisite orchid from just a single leaf.
Let’s dive into the specific techniques and criteria necessary for selecting viable parts of the plant and discuss the conditions that will promote the best growth potential for your new orchid cuttings.
When considering how to take leaf cuttings from orchids, it’s essential to identify healthy leaves that display no signs of disease or stress. Choose leaves that are fully developed and have a firm texture.
Moreover, the environment for nurturing leaf cuttings should be warm, with high humidity, and possess good airflow to discourage fungal growth.
- Inspect the orchid plant carefully to identify potential leaves for cutting.
- Select leaves that are mature, healthy, and free of any blemishes.
- Ensure the selected leaf has a visible vein, as this indicates the presence of growth nodes which are crucial for development.
Remember, patience is not just a virtue; it’s a necessity when it comes to propagating orchids through leaf cuttings.
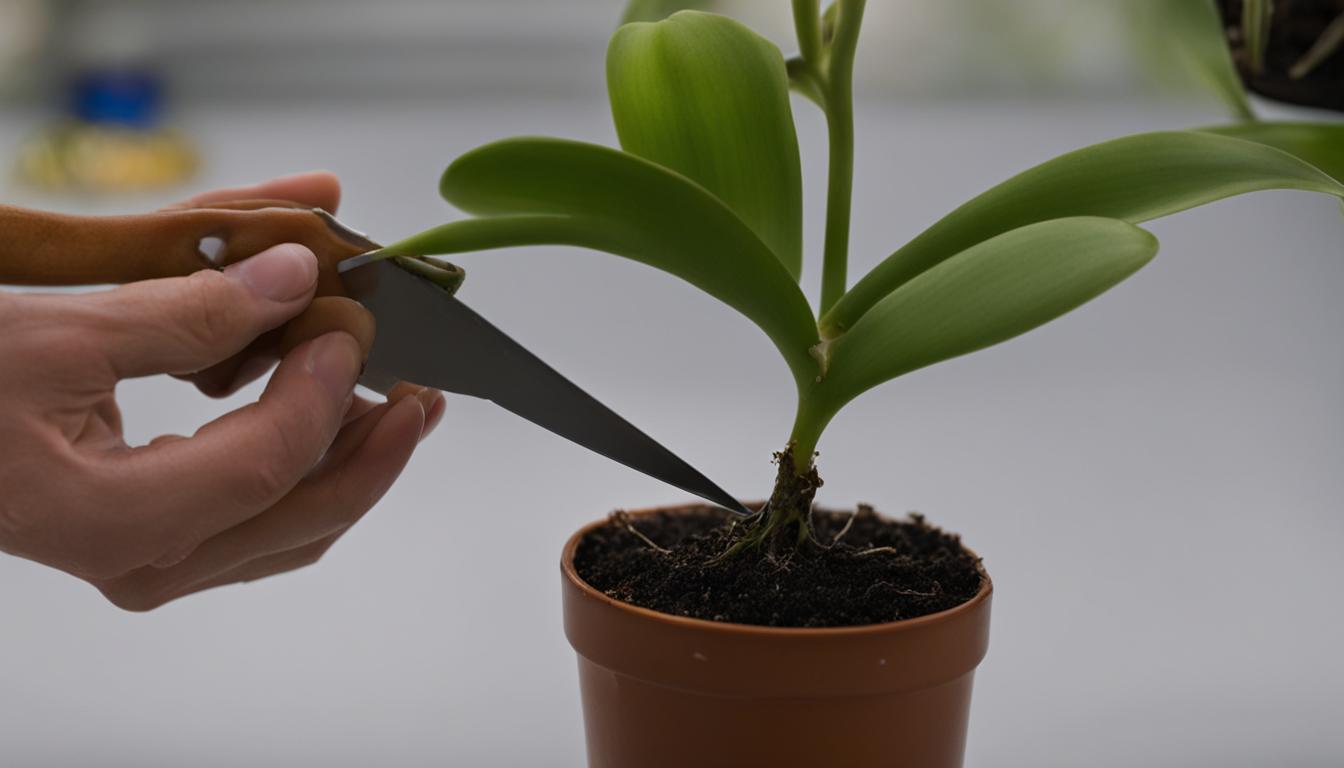
The nurturing process begins with a clean cut using sterilized tools. This helps to prevent any infection and ensures a smooth recovery for the parent plant.
Once the cuttings are obtained, they should be treated with a rooting hormone before being placed in a suitable growth medium.
The next phase is critical: monitoring your orchid leaf cuttings and maintaining the correct conditions.
Only through consistent care and observation will the cuttings thrive and eventually mature into new, stunning orchids.
| Criterion | Importance | Signs to Look For |
|---|---|---|
| Leaf Health | Essential for successful propagation | Rich color, firm texture, absence of spots or blemishes |
| Growth Potential | High | Visible vein along leaf indicating growth nodes |
| Environment for Cuttings | Critical | Warm temperature, high humidity, good airflow |
| Cutting Tools | Mandatory for clean cuts | Sterilized scissors or blades |
Though the information here gives you a glimpse into the delicate process of orchid leaf cuttings, it’s important to delve deeper into each step to ensure your propagation efforts bear fruit or, more accurately, bear flowers.

Preparing Your Tools and Workspace for Propagation
As I embark on the adventure of propagating orchids through leaf cuttings, I know that my success starts with thorough preparation.
A clean and organized workspace, along with meticulously disinfected tools, forms the linchpin of preventing disease that can jeopardize the delicate propagation process.
Here’s how I account for each critical step to pave the way for thriving orchid cuttings.

Disinfection: The First Step to Healthy Orchids
To ensure the disease does not compromise the health of my orchid cuttings, I take the time to disinfect my tools thoroughly. The process of disinfection is not just a cursory rinse but an intentional practice of immersing shears and instruments in a solution that eradicates any pathogens present.
I often opt for a blend of nine parts water to one part bleach to soak my tools, a method recommended by experienced orchid growers.
After a period of disinfection, I rinse the tools with distilled water to remove any residual chemical traces, ensuring my future orchids have a fresh and uncontaminated start.
Choosing the Appropriate Planters and Medium
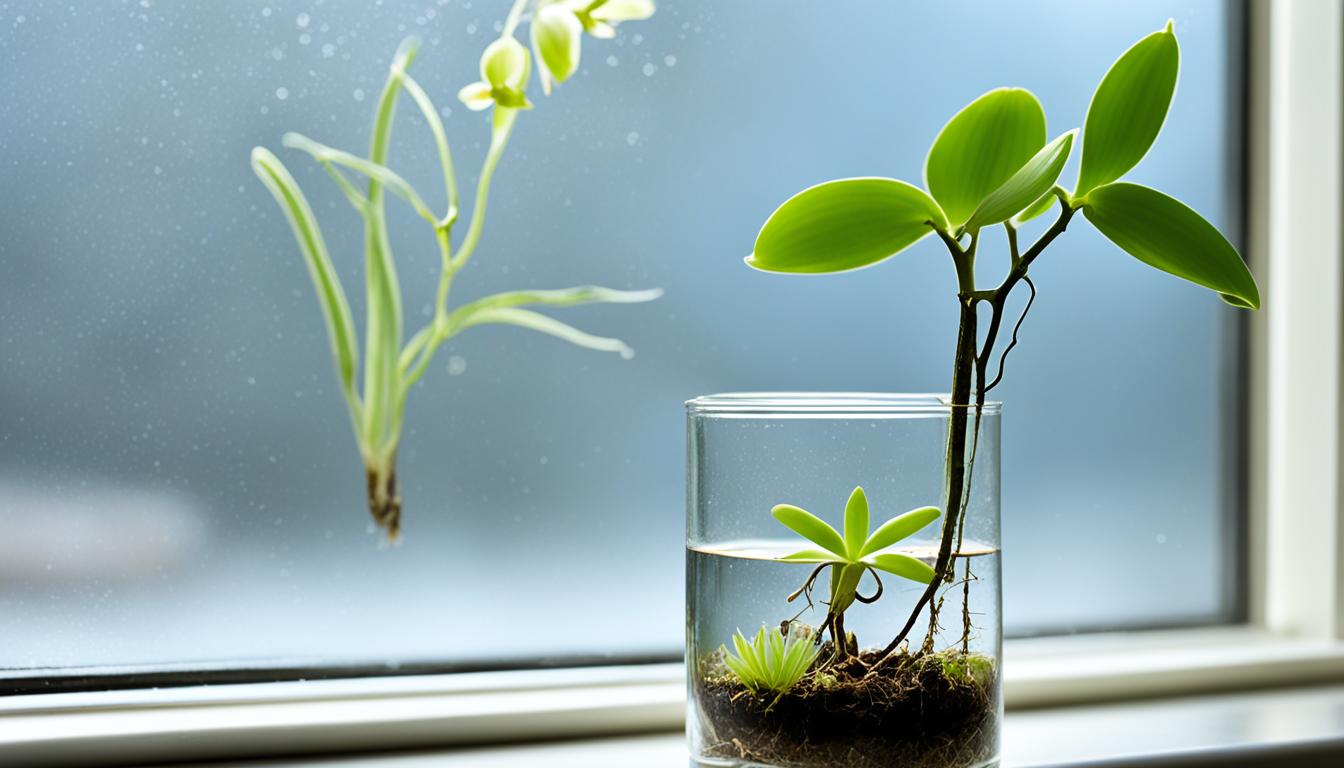
Selecting the right orchid potting medium is equally crucial. Sphagnum moss is a favorite amongst orchid enthusiasts for its exceptional moisture retention without becoming soggy, which is vital for root development.
However, I know that as much as the medium matters, the decision on appropriate planters for orchids is equally important. Orchid roots require ample air circulation, and using planters with adequate drainage is key.
This ensures water can freely flow, preventing the dangers of root rot.
- Orchid Potting Medium: Sphagnum Moss
- Planter Requirements: Excellent Drainage
- Disinfection Solution: 1 Part Bleach to 9 Parts Water
In my experience, this initial investment of time in setting up a clean and conducive space pays dividends in the form of healthy orchids, and it’s a ritual I always adhere to before I begin how to take leaf cuttings from orchids.
Step-by-Step Guide to Propagating Orchids
Welcome to the comprehensive walkthrough on the art of orchid leaf-cutting propagation. Orchid enthusiasts often find propagating orchids from leaf cuttings to be a fulfilling endeavor.
The process encompasses several steps, from the initial cutting and preparing the rhizome to the phase of rooting the cuttings, culminating in the emergence of new orchid plants.
Let’s delve into the details to ensure your propagation attempt is a success.
Cutting and Preparing the Rhizome
My initial step is to select a healthy orchid leaf from which the rhizome segment will be cut. With clean, disinfected tools, I carefully sever a portion of the rhizome with at least one node attached.
To prevent disease and encourage healing, the cut area is treated with a protective solution such as melted candle wax. I sometimes find soaking the rhizome in ginger water for a short period beneficial for enhancing resistance against potential fungal infections.
Rooting the Cuttings: Techniques and Tips
After preparing the rhizome cuttings, the next phase is rooting. I create a nurturing environment by placing the cuttings in a substrate that holds moisture without becoming waterlogged, like sphagnum moss or a fine-grade orchid bark mix.
One insightful trick I’ve learned is to repurpose clear plastic containers to fashion miniature greenhouses, which aid in maintaining high humidity levels vital for root development. These greenhouses also allow me to keep a close watch on the cuttings’ progress.
Ventilation is key – I introduce appropriate air flow to stave off mold. A consistent weekly routine that includes misting with water or a diluted seaweed solution fosters robust root growth.
Below is a table summarizing the materials and conditions needed:
| Materials | Conditions | Frequency |
|---|---|---|
| Disinfected Cutting Tool | Clean, disease-free work area | Once, at the beginning of propagation |
| Candle Wax or Ginger Water | After cutting for protection and prevention | Immediately after cutting |
| Mini Greenhouse (Plastic Container) | High humidity, proper ventilation | Monitor daily, ventilate as needed |
| Misting Bottle (Water/Seaweed Solution) | Humidity, avoiding dehydration of cuttings | Weekly misting |
| Sphagnum Moss or Orchid Bark Mix | Medium for rooting, retaining moisture | Prepare once, check monthly for moisture |
With patience and adherence to these guidelines, rooting the cuttings can lead to the thrilling emergence of new orchid growth. Remember to monitor your propagated cuttings regularly and make adjustments to their environment as necessary to ensure successful propagation.

Conclusion
Embarking on the journey of propagating orchids from leaf cuttings has been an enriching experience that cultivates patience and meticulousness. Every step, from the careful selection of the mother plant to providing the perfect environmental conditions, contributes to the art of successful home propagation.
In my practice, I’ve learned that the attention to detail in cutting and nurturing orchid leaf cuttings is very much the essence of horticultural devotion.
My experience underscores the imperative of precision and cleanliness throughout the process to prevent any potential issues while encouraging the optimal development of new orchid plants.
I’ve discovered that the magic of watching orchid leaf cuttings grow into full-fledged plants is a testament to the wonders of nature and human patience. It’s a reward that is well worth the effort and wait.
To those intrigued by the delicate process of cultivating orchids, let this guide serve as a beacon, illuminating the path toward horticultural achievement. While the process may seem daunting at first, adherence to these guidelines will ensure a greater chance of success.
May your orchid propagation endeavors be fruitful, and the blooms that result bring a flourish of beauty to your garden.
FAQ
What is orchid leaf cutting propagation?
Orchid leaf cutting propagation is a method of creating new orchid plants by cutting a leaf or a section of the orchid’s rhizome with leaf nodes attached, and nurturing it until it develops roots and becomes a new, independent plant.
Can all types of orchids be propagated from leaf cuttings?
Not all orchids can be propagated from leaf cuttings effectively. Monopodial orchids, like Phalaenopsis, can sometimes be propagated from stem cuttings, while sympodial orchids, like Dendrobium nobile, may also occasionally be propagated from stem pieces or back bulbs with dormant eyes.
What is the difference between monopodial and sympodial orchids?
Monopodial orchids have a single, upright stem that grows continuously from the tip, such as Phalaenopsis and Vanda. Sympodial orchids, on the other hand, grow along a horizontal rhizome with multiple growth points, like Dendrobium and Cattleya.
What does propagation through division mean?
Propagation through division involves separating an orchid plant into two or more parts, each with its own pseudobulb and root system. This method is commonly used for sympodial orchids, where the plant’s natural growth allows for easy splitting.
What are orchid keikis?
Orchid keikis are baby plants that grow from the parent plant, either on the flower spike or at the base. They are an exact genetic copy of the mother plant and can be removed and potted individually once they develop a sufficient root system.
How do you create the right environment for orchid cuttings?
Creating the right environment involves providing high humidity, controlled temperature, and filtered light. Using a plastic enclosure or a miniature greenhouse can maintain these conditions to encourage growth and rooting of orchid cuttings.
When is the best time to propagate orchids?
The best time to propagate orchids is generally after the blooming cycle and before repotting. This is when the plant is least stressed and can recover from the propagation process more effectively. Keikis can be propagated as soon as their roots are a few inches long.
What techniques are used for orchid leaf cutting propagation?
For orchid leaf cutting propagation, select a healthy and mature leaf, make a clean cut, apply a fungicide or rooting hormone if desired, and place the leaf cutting in a suitable rooting medium under the correct environmental conditions.
Why is disinfection important before propagating orchids?
Disinfection is crucial because it helps to prevent the spread of disease and pests to the new cuttings. Using sterilized tools minimizes the risk of introducing harmful organisms that could jeopardize the health of the new plants.
What should I consider when choosing planters and potting medium for orchids?
When choosing planters, ensure they have adequate drainage, and when selecting a potting medium, consider sphagnum moss or bark mixtures that retain moisture yet provide good aeration. The right container and medium will support the new growth and prevent root rot.
How do you cut and prepare the rhizome for orchid propagation?
To cut and prepare the rhizome, first identify a section with healthy growth eyes. Use a disinfected knife or pruning shears to make a clean cut, allowing for at least one pseudobulb and a portion of the rhizome on each division. Treat cut areas with a fungicide to prevent infections.
Do you have any tips for rooting orchid cuttings?
For successful rooting, ensure that the orchid cuttings are placed in a humidity-rich environment with controlled temperatures and indirect light. Using a rooting hormone may stimulate root development, and regular misting can provide much-needed moisture.
Leave a Reply